
Spreadsheet Former and Printer
Very often we have lists of data held in rows, which we display as a form so that
other calculations can be based on data on the same form, and for presentation reasons.
We look the data up from other sheets using Excel lookup formulae, such as the VLOOKUP function.
Usually a single cell identifies the data on the form both visually and within the calculations.
This cell can usually be selected from a list which appears elsewhere on the spreadsheet.
The spreadsheet formatting options can enhance the presentation so that it looks like a professional form,
while built in Excel functions (eg. drop down boxes) also simplify selection of the target cell.
It is often desirable to print not only individual copies of the form generated, but also a copy of every form possible,
from the full list of values available for the target cell.
Whilst this task could be carried out manually, it is desirable to have a utility which can do this for you.
This is where the Spreadsheet Printer and Former comes in. In fact, the tool allows multiple print ranges
to be specified, each being printed in turn, so that several pages of documentation can be collated automatically.
Moreover the tool also allows each range to be pasted as values, with full formatting preserved, on new spreadsheets,
each named based on the target lookup range.
When the tool's icon is clicked,
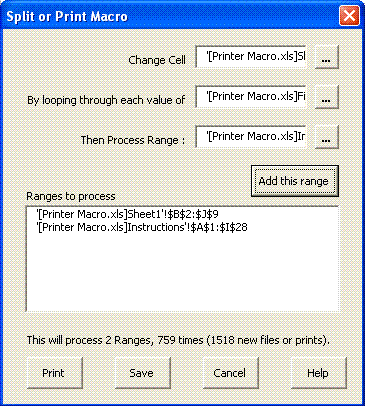
 the following form appears

This form consists of three range selection buttons ;
- Definition of the "target cell" which is used by the lookup formulae.
- Specification of the range of cells to loop through, changing the target cell to each value in this range
- Selection of the range of cells to process on each cycle.
Note that many selections of
ranges to process on each cycle can be specified. This enables
different "forms" to be created - often on different sheets.
Each would be processed on each cycle, so the "reports" would
automatically be collated to be grouped together.
Ranges can be typed into each
box, or the ... box clicked, and you may click and drag the mouse over
the spreadsheet to define the range (even on different sheets).
Once a range has been defined,
the "Add this Range" button should be clicked, whereupon it will be
copied to the "Ranges to process" box. The macro will count the number
of cells that are in the "loop through" range, and multiply this
against the number of ranges you have selected to process, and notify
you that this number of new prints or files will be generated.
After that, Print or Save could be clicked, which will process every
range defined in the following way.
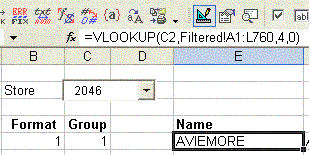
- Suppose that the spreadsheet was set up as shown in the example above,
with the VLOOKUP trying to find the contents of cell C2, in the range A1:L760
on sheet "Filtered", picking up column number 4, and resulting in "AVIEMORE"
being displayed. The drop down box is linked to cell C2, with data available
being linked to range A1:A760 on sheet "Filtered", so that the user can easily
select the store number he wants. Other VLOOKUPs are positioned around the
sheet, resulting in a form showing useful information about the store, and a
further sheet shows general information not linked to the store, but about how
to use the information. Electronically, the spreadsheet is useful as a lookup
reference, but a paper copy would be useful to hand out to individual store
managers, along with the instructions from the other sheet.
- Click on the Spreadsheet Printer and Former Icon
, click on the
 button next to "Change Cell", and
specify cell C2.
button next to "Change Cell", and
specify cell C2.
- Select the range too loop through by clicking on the next
button down, moving to sheet
"Filtered", and selecting the range A1:A760.
- Next, define the range to process by clicking
and selecting the range with the
lookups on - your form showing the store information. Click "Add this range",
and select the second sheet, showing the instructions on how to use the data,
adding to the list of ranges to process by clicking Add this range. The print / split form will now look like this ;
- Now click Print. The cell C2 will be set to the contents of cell A1 on
sheet "Filtered". The VLOOKUPs will automatically update, the first range
shown in box "Ranges to Process" (the information about the store now in cell
C2) will be printed, then the next range shown (the general instructions on
the other sheet) will be printed.
- Cell C2 will then be set to the contents of cell A2 on sheet "Filtered",
and the process repeated. Because of the order of printing (the data sheet
relating to the looked-up data, then the instructions sheet), the pages are
automatically collated in the order in which they should be distributed.
: If you need to send the
printed sheets by post, include the name and address on the first sheet,
positioned so that it would be visible through a name and address window on
the envelope.
- Now lets say we support the paperless office idea, and don't
want to waste rain forests. Instead of printing and sending the
reports, we want to e-mail them, or just have them as seperate
spreadsheets for reference. We don't want to send out the full,
original spreadsheet,
because this would be overly large, and we don't necessarily want each
recipient to see other recipients details.
This is where the save button comes in. In this case, the macro will
save a copy of each of the selected ranges to process after each change
of the lookup cell.
The data saved does not include any formulae, but the actual values
displayed. The actual range specified is copied, and pasted into a new
workbook as values.
The formats, and column widths are also pasted to preserve the image of
the original sheet. The data can also be saved as a spreadsheet, txt
file (tab seperated values), or .csv file (comma seperated values).
- Once the save button is clicked, a file save-as dialogue box is
opened, with a default filename the same as the current open
spreadsheet.
You may change the filename and location, utilising any of the regular features of the save-as box (e.g. make directory).
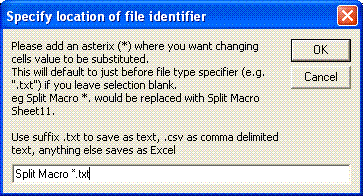
- The filename you specify here is just a starting
filename. So that each split filename can be uniquely identified, the
value of the lookup cell,
and the sheet name of the range being split are added in to the
filename. Before the new filename is constructed, you have the option
to specify where the sheet name and lookup value are added in the
filename.
At the same time, you can define whether you want the file saving as a
standard workbook, text file, or comma-seperated file. The dialogue box
that enables this is as follows ;
- Once OK is clicked the macro will cycle through each lookup
range in the same way that it does with the print option.
This time, each time a new print would be generated, the new filename
is created, the data and formats copied to a new spreadsheet, and
saved.
The status bar at the foot of the screen will be updated to show you
the process.
- :If you're using Windows XP, and want to be able to link into the newly created files easily,
you can add a directory listing to your windows taskbar. Just right click the taskbar, choose Toolbars, and click New Toolbar.
Next, locate the directory where you've saved your files.
Now when you click the double arrow next to the directory name, the
contents listing will pop up, and clicking on any filename will open it.
- :If you want to email the reports to seperate recipients (each identified by the unique identifier of the lookup cell values),
then add-innovation has a tool to help you. Just
email us, and we'll send you details.